Daily Project Update- SHOES!
Hopefully the addition of some 'Shoes' for my bike will give everyone a better sense of spatial placement. Thanks for dropping by and following my progress on this increasingly long task ;)
Achievement = Happiness
I don't know if that is the case for everyone, but for me, that is the secret of life. When I feel stuck in a rut, I'm down. This can be destructive when it comes to things I can't control. As a result, or perhaps coping mechanism, I've become amazing at ignoring things outside my power. Over the years, after painful breakup after painful breakup I've applied this to my dating and social life. Not on purpose, it's just sort of crept in through cracks in my mental armor. It's easy to look back and see that whenever I've consciously gone about courting a girl I liked, it has never worked out. I spend so much time focused on formulating the perfect setting, atmosphere, mood, etc... that I forget to be myself and just have fun. All the long term relationships I've been in have sort of caught me by surprise. I collect girlfriends the same way I've collected my guy friends, common interests making two lives take the same path. My best guy friends right now are all people I met in college. Same mindset, same career goals, same nerdy senses of humor.
This is all very stream of consciousness because I'm quite tired. Time for the Nightwalkers to rest.
The overarching thought behind this rant is that I've invested an amazing amount of time into social dynamics, without ever evaluating the reward. It's almost as if by studying and improving my social habits, the reward, while larger in quantity, is much lower in quality.
Just some personal introspection.
And here's an update on my latest practice project:

Camping!
I'm not doing it! I'm supposed to be, but I'm not. I haven't been camping in months, and somehow I was invited on not one, not two, but three camping trips this weekend. I elected to stay home and keep banging my head against Mudbox. I know that digital sculpting is the future for 3D artists, it just hasn't entered into my personal curriculum till now. Rather than be left in the dust when the uprising comes, I'm arming myself with the tools to join in battle on that glorious morn. In this case, battle being the job hunt, which in so many ways I'm already actively engaged in...
Here's a couple progress shots. This is really my first stab at 3d sculpting, and so I picked the easiest object I could think of- a concrete pillar. It seems this is a fairly common choice, and that several other people on the net picked the exact same reference image that I'm working from. Damn you Google image search. Damn you and all your glory.

Texture Mapping Experiments...
This is another blog post for digital artists pretty much exclusively.
Recently while learning about procedural texturing I saw an interesting use of Ambient Occlusion. The point was made that objects tend to develop rust and grime in areas that are partly, or completely occluded. Since adding rust and grime is a big part of adding realism to textures, I set out to find ways to apply this to traditional texturing.
The basic process is to first adjust the curves of your AO map so there is little grey, you don't want the rust/grime fading in and blending with the base color, you want it to appear to be on top. Once you've got that looking nice, Use the adjusted map as a layer mask. (To paste the map directly in, you have to ALT-click on the layer mask to open it in 'document mode', then ALT-Click again to get back to your regular project.)
 Here's the AO map, and the resulting texture from this process.
 Clearly this is far from completed, but it's a quick and easy way to lay in some detail in the right areas. Obviously you'll need to go in and do some brush work to make it look more realistic. Adding some noise to break up the AO map (render clouds set to overlay...) is one possible solution. I think this could be very usefull if you needed to texture a lot of background props very quickly. I'd be hesitant to use this method on a main prop, unless it was just to block in the details in a first pass.
The best education...
The best education I ever received with relation to my professional career didn't come in school. No, it came from an account manager at my first real job, Sam Rabinowitz. He showed me that a little bit of kindness and a warm smile can go a lot farther than beating yourself into the ground with hard work. You still have to do the work, but with the right attitude you'll get so much farther with people, in life, and in your personal goals. Sam was a natural networker. A people person through and through. He was never the dynamite sales person, but he was friendly, consistant, and ultimatly blew past all the hot-shots.
In addition to my little stroll through personal memories and insight, here's a little compairason I put together on my most recent project.
Eco-Unfriendly
I just realized how un-green I am. (And how geeky I am, because that possibly meaning 'uncool' in the 'Fifth Element' was the first thing that popped into my mind...) I remember Jon Rick telling me how excited he was that he didn't have to pay electricity at his new place, it was part of the rent. He had a fleet of computers, vending machine, Street fighter 2 cabinet, Theater projector, AC unit, and a horde of other electronic devices going 24/7. Looking around my room I realize I have just as many whatzits going on here. I sit here in front of 4 monitors, and two laptop computers all consuming electricity while I lament about wasting electricity...
In other news, the process of rendering out ambient occlusion maps for all my high poly geometry took way longer than I'd anticipated, and then using Maya's 'transfer maps' to bake that onto my low poly models took equally as long. On top of that, my secondary rendering machine became inexplicably unstable. So rather than working on both machines, I spent the night watching Hulu on the fickle one, and rendering on the old reliable.
I'm still pretty unhappy with the texture on my S&W500 model. I was hoping the addition of AO would give it that extra 'pop' that made me go, "Ahhh... Now we're moving in the right direciton..." Well, I'm going to rest now and give it a fresh start in the morning. Er, Afternoon. Whatever.
Mental Shutdown
I've set a personal deadline to finish my latest project by Friday... so I spend most of the day, and all the night till now working on it. All I really have to do is make high quality Color and Specular maps, and then call it a day. This is proving more difficult than it sounds. I'm deliberately staying away from making the texture look 'grungy' and worn, ala Fallout 3. It's more challenging than I thought to make something that looks clean, and yet realistic. When something is covered in scratches and wear, those bits of detail sell the object. With those absent, I'm struggling to make the texture believable. As a result, I'm hand-painting every bit of the texture, which introduces another hurdle- painting something by hand that is meant to be photo-realistic. Turns out it's time consuming.
My mind is done for the night. Between random crashes, and failing at simple tasks, I knew it was time to turn in. For some reason I'm having problems rendering an Ambient occusion map from high-poly geometry to Low-poly. The map is comming out just white and black, no shading.
Maybe some sleep will cure my problems. It's a fond dream.
Normal Mapping experiments
If you're a 3D artist and you want to work on Current/Next gen games, normal mapping is an incredibly important skill to know. If you're visiting mt blog and you're not a 3d artist, this may be a post to skip, unless you're looking to educate yourself on deeply geeky topics. To fill you in, a normal map adds additional shading information to the surface of an object, to make a simple shape look more detailed usually.
I recently had a friend who was working for Infinity Ward look over some of my project files, and he pointed out some causes for normal map errors I was facing. Basically he told me that wherever you have a hard edge on your model, you also need to separate those areas in your UV map. This is caused by Ray misses in the projection from the Low to Hi poly model.
I put together some simple test renders so that I could wrap my head around the concept more. Here they are, with a screen cap from Maya first for reference.

Example 1


Example 3


After looking over these, Example 3, the way he explained laying out my UV's and Hard edges produces the closest result to the hi-poly model. My reservations about using this method though is that it's going to result in a very complex and potentially wasteful UV layout, based on the number of pieces the model end up broken into. If any one has any suggestions, I'm eager to learn how I can improve my work-flow.
(Thanks to anyone from Polycount for stopping by to lend a hand. There is a discussion about this going on RIGHT HERE.)
Pixel aspect ratio correction is for preview purposes only. Turn it off for maximum image quality.
Don't turn it off.
Instead, go to View>Pixel Aspect Ratio>Square
If you've done a lot of 3d rending you've probably come up against the error before. More than likely it's because you picked a preset that doesn't default to square pixels. Not to fear, you are saved.![]()
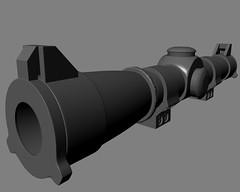
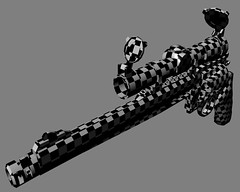
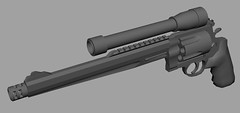
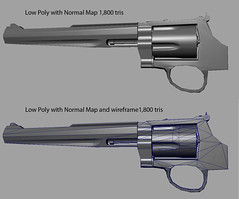
S&W 500 Progress Update...
Alrighty kids! Put your geek hats on, because I've got a serious update on this project for ya. So all the modeling is complete now. The Low-poly base mesh is done and cleaned up, and the High-poly Subdivision model is complete. At this point I've got to bake out the normal maps and paint more detail into them for screws, machining, and other fine details. From there it's just texture mapping the surfaces, and making some nice spec maps to really sell the metal texture and normal maps.
Here's a few pics for you to peruse. (After you click the Thumbnail, you can click the 'all sizes' button on the Flickr page to see a larger version of each image.)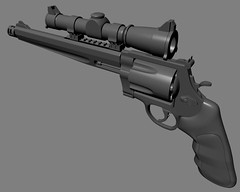
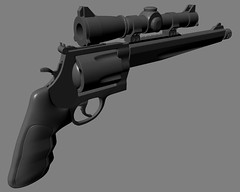
...progress on S&W 500 project...
I've finally had some free time, and could pour a few hours into this project. The low-poly gun is completed, and I've got a nice unrwap going. I've just got to finish the high poly model, bake out the normal map, and then paint the gun. This project has been a long time in the making, but I'm pretty happy so far...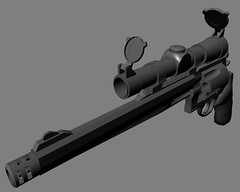
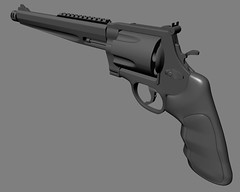
S&W 500 Update...
Progress-2009-05-30
Originally uploaded by mcbradd
I ran into a snag with the construction of the gun frame, and had to basically remodel the whole thing so that the gun could actually animate a reload cycle properly...
Also, I started with the barrel and cartridge as 8-sided cylinders. After putting this amount of work and detail into this piece, they seemed glaringly low-rez, so I bumped them up to 16. It only added about 50 poly's to the model, and I think they were well spent.
I've got the entire gun modeled, and the Sud-D version completed for baking out the normal maps... Just got to finish the Scope and holster clips... hooray! I can see the light at then end of the tunnel!
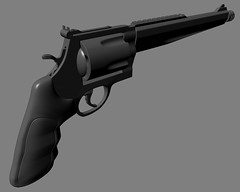
Ok... a real update...
Progress-2009-05-28
Originally uploaded by mcbradd
Now that I have a handle on what I'm actually doing, things are moving along wonderfully. The normal maps are coming out much cleaner, and with some touch ups in Photoshop, should look amazing.
This probably seems like a trivial accomplishment to everyone else, but I'm quite pleased with myself. Everything about this project marks firsts for me. This is my first attempt at a photo-realistic weapon, and first time baking Normals from shapes this complex.
